Cybersecurity: Penetration testing and ethical hacking tools.
Why Python for Cybersecurity?
Python is a beginner-friendly programming language known for its simplicity, readability and versatility. Here’s why it’s a top choice for cybersecurity:
Ease of Use: Python’s clear syntax lets us write complex security tools with fewer lines of code compared to languages like C++ or Java.
Extensive Libraries: Python offers powerful libraries tailored for cybersecurity, such as:
Requests for handling HTTP requests.
Scapy for network packet manipulation.
PyCrypto (or cryptography) for encryption and decryption.
Paramiko is used for creating SSH connections
a - The first step, create a virtual environment (for Python 2), For Python 3, venv is included in the stardard library:
$ pip install virtualenv
...\> pip install virtualenvb - Create a virtual environment:
$ python3 -m venv ./venv
...\> py -m venv venvc - Activate the virtual environment:
MacOS:
$source ./venv/bin/activate
Window:
>venv\Scripts\activate
d - Deactivate the virtual environment:
$ deactivate...\> deactivate
Requests
Requests library simplifies making HTTP requests, which is particularly useful for interacting with web APIs or testing web vulnerabilities.
import requests

# Making a GET request
r = requests.get('https://www.teslapython.com')

# check status code for response received
# success code - 200
print(r)

# print content of request
print(r.content)
Scapy (scapy.net)
Scapy is a powerful library for network packet manipulation, enabling you to craft, send and analyze packets. It’s widely used for network scanning, packet sniffing and custom network tool development. Scapy is a powerful Python-based interactive packet manipulation program and library.
It is able to forge or decode packets of a wide number of protocols, send them on the wire, capture them, store or read them using pcap files, match requests and replies, and much more. It is designed to allow fast packet prototyping by using default values that work.
It can easily handle most classical tasks like scanning, tracerouting, probing, unit tests, attacks or network discovery (it can replace hping, 85% of nmap, arpspoof, arp-sk, arping, tcpdump, wireshark, p0f, etc.). It also performs very well at a lot of other specific tasks that most other tools can’t handle, like sending invalid frames, injecting your own 802.11 frames, combining techniques (VLAN hopping+ARP cache poisoning, VoIP decoding on WEP protected channel, …), etc.
Scapy supports Python 3.7+. It’s intended to be cross platform, and runs on many different platforms (Linux, OSX, *BSD, and Windows).
PythonforCybersecurity/PortScan.py¶from scapy.all import *
import ipaddress
ports = [25,80,53,443,445,8080,8443]
def SynScan(host):
ans,unans = sr(
IP(dst=host)/
TCP(sport=33333,dport=ports,flags="S")
,timeout=2,verbose=0)
print("Open ports at %s:" % host)
for (s,r,) in ans:
if s[TCP].dport == r[TCP].sport and r[TCP].flags=="SA":
print(s[TCP].dport)
def DNSScan(host):
ans,unans = sr(
IP(dst=host)/
UDP(dport=53)/
DNS(rd=1,qd=DNSQR(qname="google.com"))
,timeout=2,verbose=0)
if ans and ans[UDP]:
print("DNS Server at %s"%host)
host = input("Enter IP Address: ")
try:
ipaddress.ip_address(host)
except:
print("Invalid address")
exit(-1)
SynScan(host)
DNSScan(host)
Creat a virtual environment as above, and then:
$ pip install scapy
...\> pip install scapy
$ python PortScan.py
Enter IP address:
...\> py PortScan.py
Enter IP address:
PyCryto or Cryptography
Cryptography library provides robust encryption and decryption capabilities, allowing you to secure data through various cryptographic operations.
PythonforCybersecurity/cryptography.py¶ from cryptography.fernet import Fernet
# Generate a key and create a cipher suite
key = Fernet.generate_key()
cipher_suite = Fernet(key)
print("Encryption Key:", key.decode())
# Encrypt and decrypt a message
message = "Secure Message".encode()
encrypted_message = cipher_suite.encrypt(message)
print("Encrypted:", encrypted_message)
decrypted_message = cipher_suite.decrypt(encrypted_message)
print("Decrypted:", decrypted_message.decode())
$ pip install cryptography
$ python crytography.py
...\> pip install cryptography
...\> py crytography.py
Terminal:¶Encryption Key: 8-3Rx7r2vuoOBKkWIkm8q86VgEbFCbXQXJJOQ-kEvX8=
Encrypted: b'gAAAAABn7oEtkg_gkyOp-M6tdRKCy-rhBsO6_dtpV36CDD_581Bq9vOVHygm61Ml-75GDnSuzcUGp6n91VgR5A-zWqn1k3DfJw=='
Decrypted: Secure Message
Paramiko (parakimo.org)
Paramiko is a pure-Python 1 (3.6+) implementation of the SSHv2 protocol 2, providing both client and server functionality. It provides the foundation for the high-level SSH library Fabric, which is what we recommend you use for common client use-cases such as running remote shell commands or transferring files.
PythonforCybersecurity/ParakimoCredentials.py¶import paramiko
import telnetlib
import socket
def SSHLogin(host,port,username,password):
try:
ssh = paramiko.SSHClient()
ssh.set_missing_host_key_policy(paramiko.AutoAddPolicy())
ssh.connect(host,port=port,username=username,password=password)
ssh_session = ssh.get_transport().open_session()
if ssh_session.active:
print("SSH login successful on %s:%s with username %s and password %s" % (host,port,username,password))
ssh.close()
except:
print("SSH login failed %s %s" % (username,password))
def TelnetLogin(host,port,username,password):
tn = telnetlib.Telnet(host,port,timeout=1)
tn.read_until(b"login: ")
tn.write((username + "\n").encode("utf-8"))
tn.read_until(b"Password: ")
tn.write((password + "\n").encode("utf-8"))
try:
result = tn.expect([b"Last login"])
if (result[0] > 0):
print("Telnet login successful on %s:%s with username %s and password %s" % (host,port,username,password))
tn.close()
except (EOFError,socket.timeout):
print("Telnet login failed %s %s" % (username,password))
host = "127.0.0.1"
sshport = 2200
telnetport = 23
with open("defaults.txt","r") as f:
for line in f:
vals = line.split()
username = vals[0].strip()
password = vals[1].strip()
SSHLogin(host,sshport,username,password)
TelnetLogin(host,telnetport,username,password)
Creat a file default.txt:
PythonforCybersecurity/default.txt¶admin pass
user1 Password123
Creat a virtual environment as above, and then:
$ pip install parakimo
$ python ParakimoCredentials.py
...\> pip install parakimo
...\> py ParakimoCredentials.py
Kali Linux
Learning Kali Linux for Security Testing, Penetration Testing and Ethical Hacking
Python coding for ethical hackers and pentesters
Open Kali Linux via VMware, then let’s install a Python IDE development, we use WingIDE. Open FireFox in Kali Linux, visit wingware.com/downloads, choose Linux to download (we have Pro, Personal version,.., it is up to you) Right click the downloaded file, choose Open Terminal Here
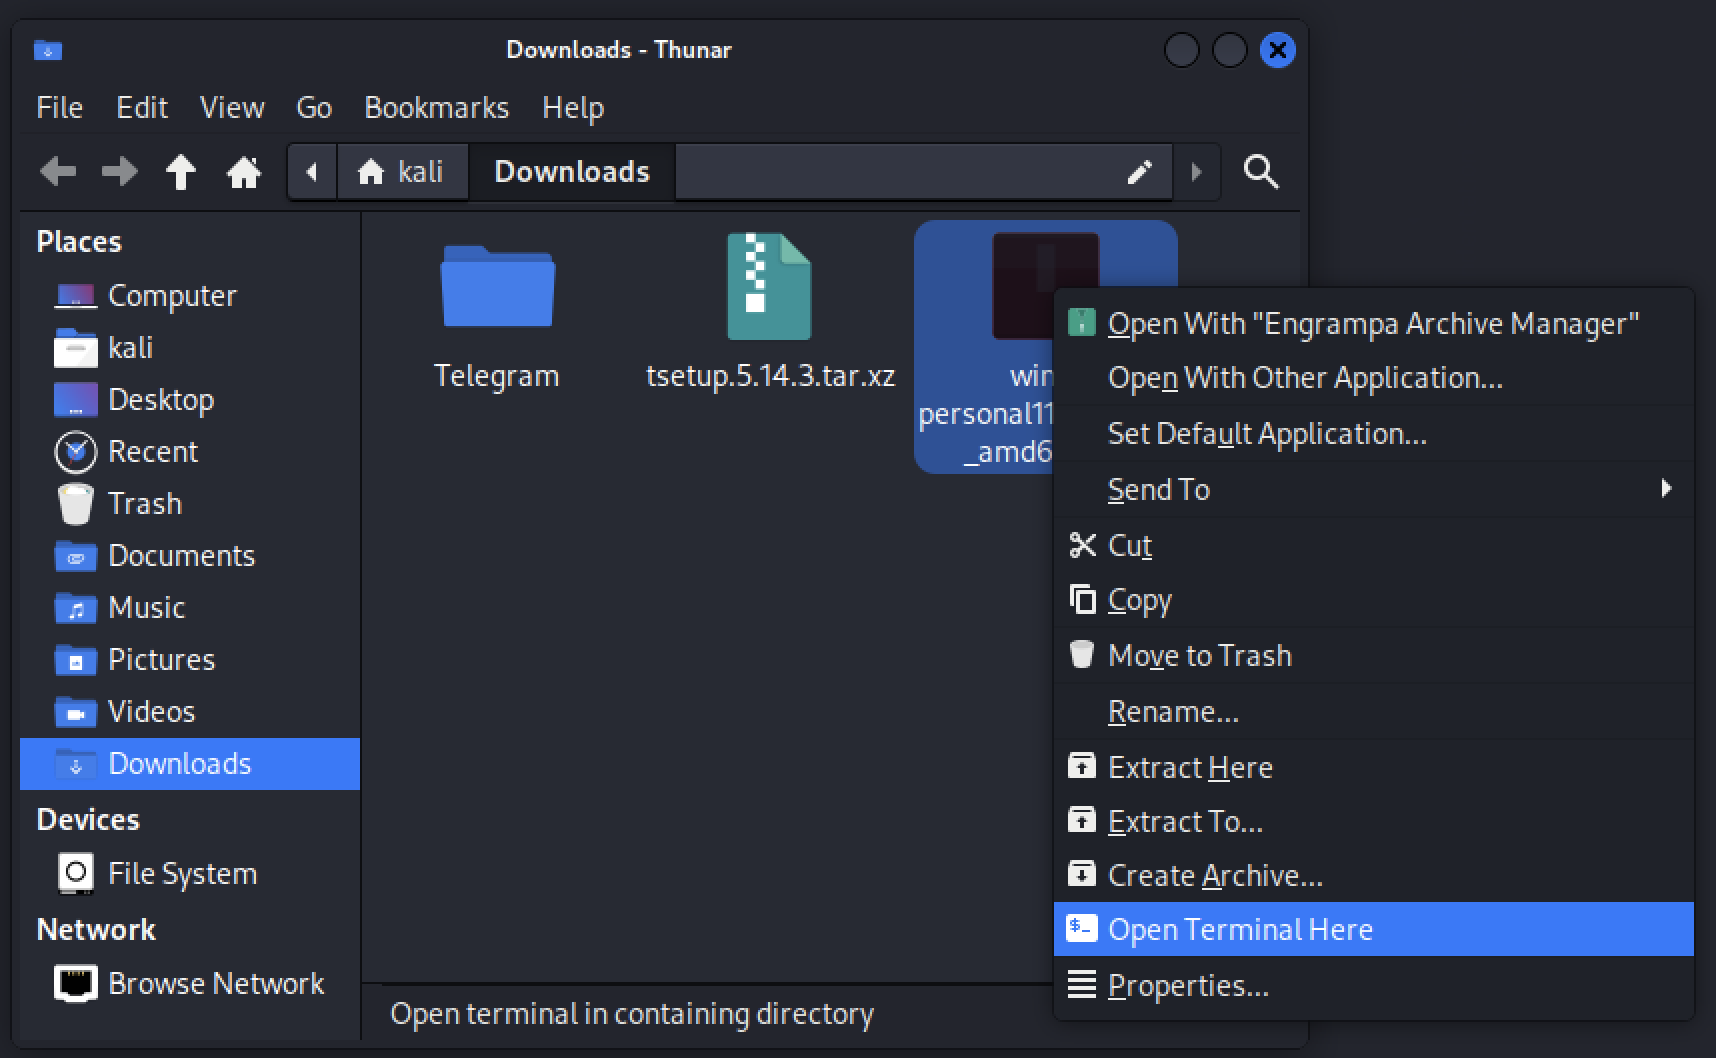
┌──(kali㉿kali)-[~/Downloads]
└─$ sudo dpkg -i wing-personal11_11.0.2-0_amd64.deb
[sudo] password for kali:
Selecting previously unselected package wing-personal11.
(Reading database ... 445494 files and directories currently installed.)
Preparing to unpack wing-personal11_11.0.2-0_amd64.deb ...
Unpacking wing-personal11 (11.0.2-0) ...
Setting up wing-personal11 (11.0.2-0) ...
Processing triggers for libc-bin (2.41-6) ...
Processing triggers for kali-menu (2025.2.7) ...
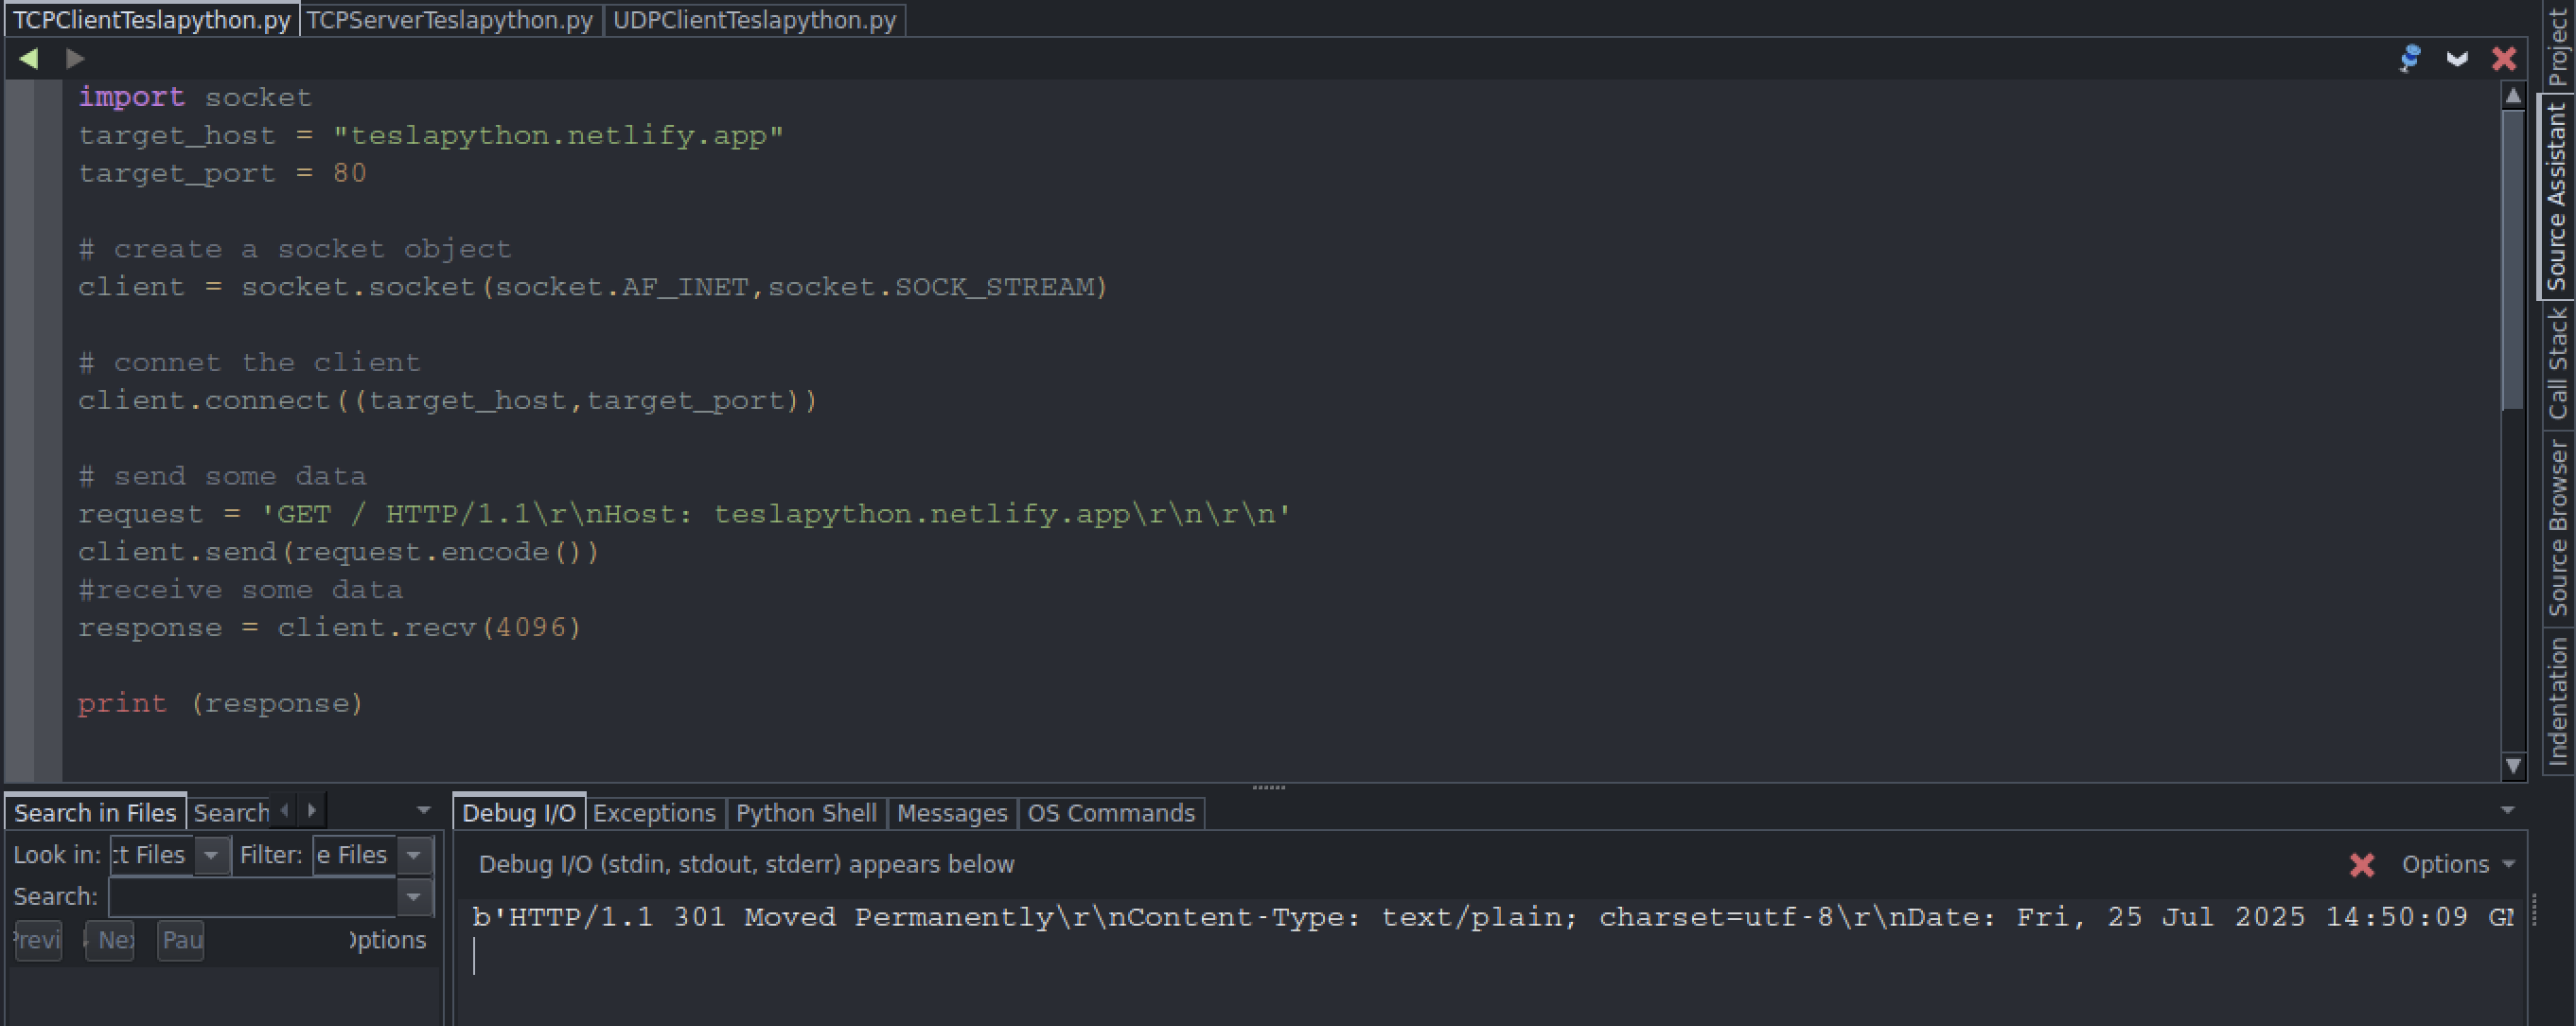
TCP Client
This is where being able to quickly create a TCP client comes in extremely handy.
UDP Client

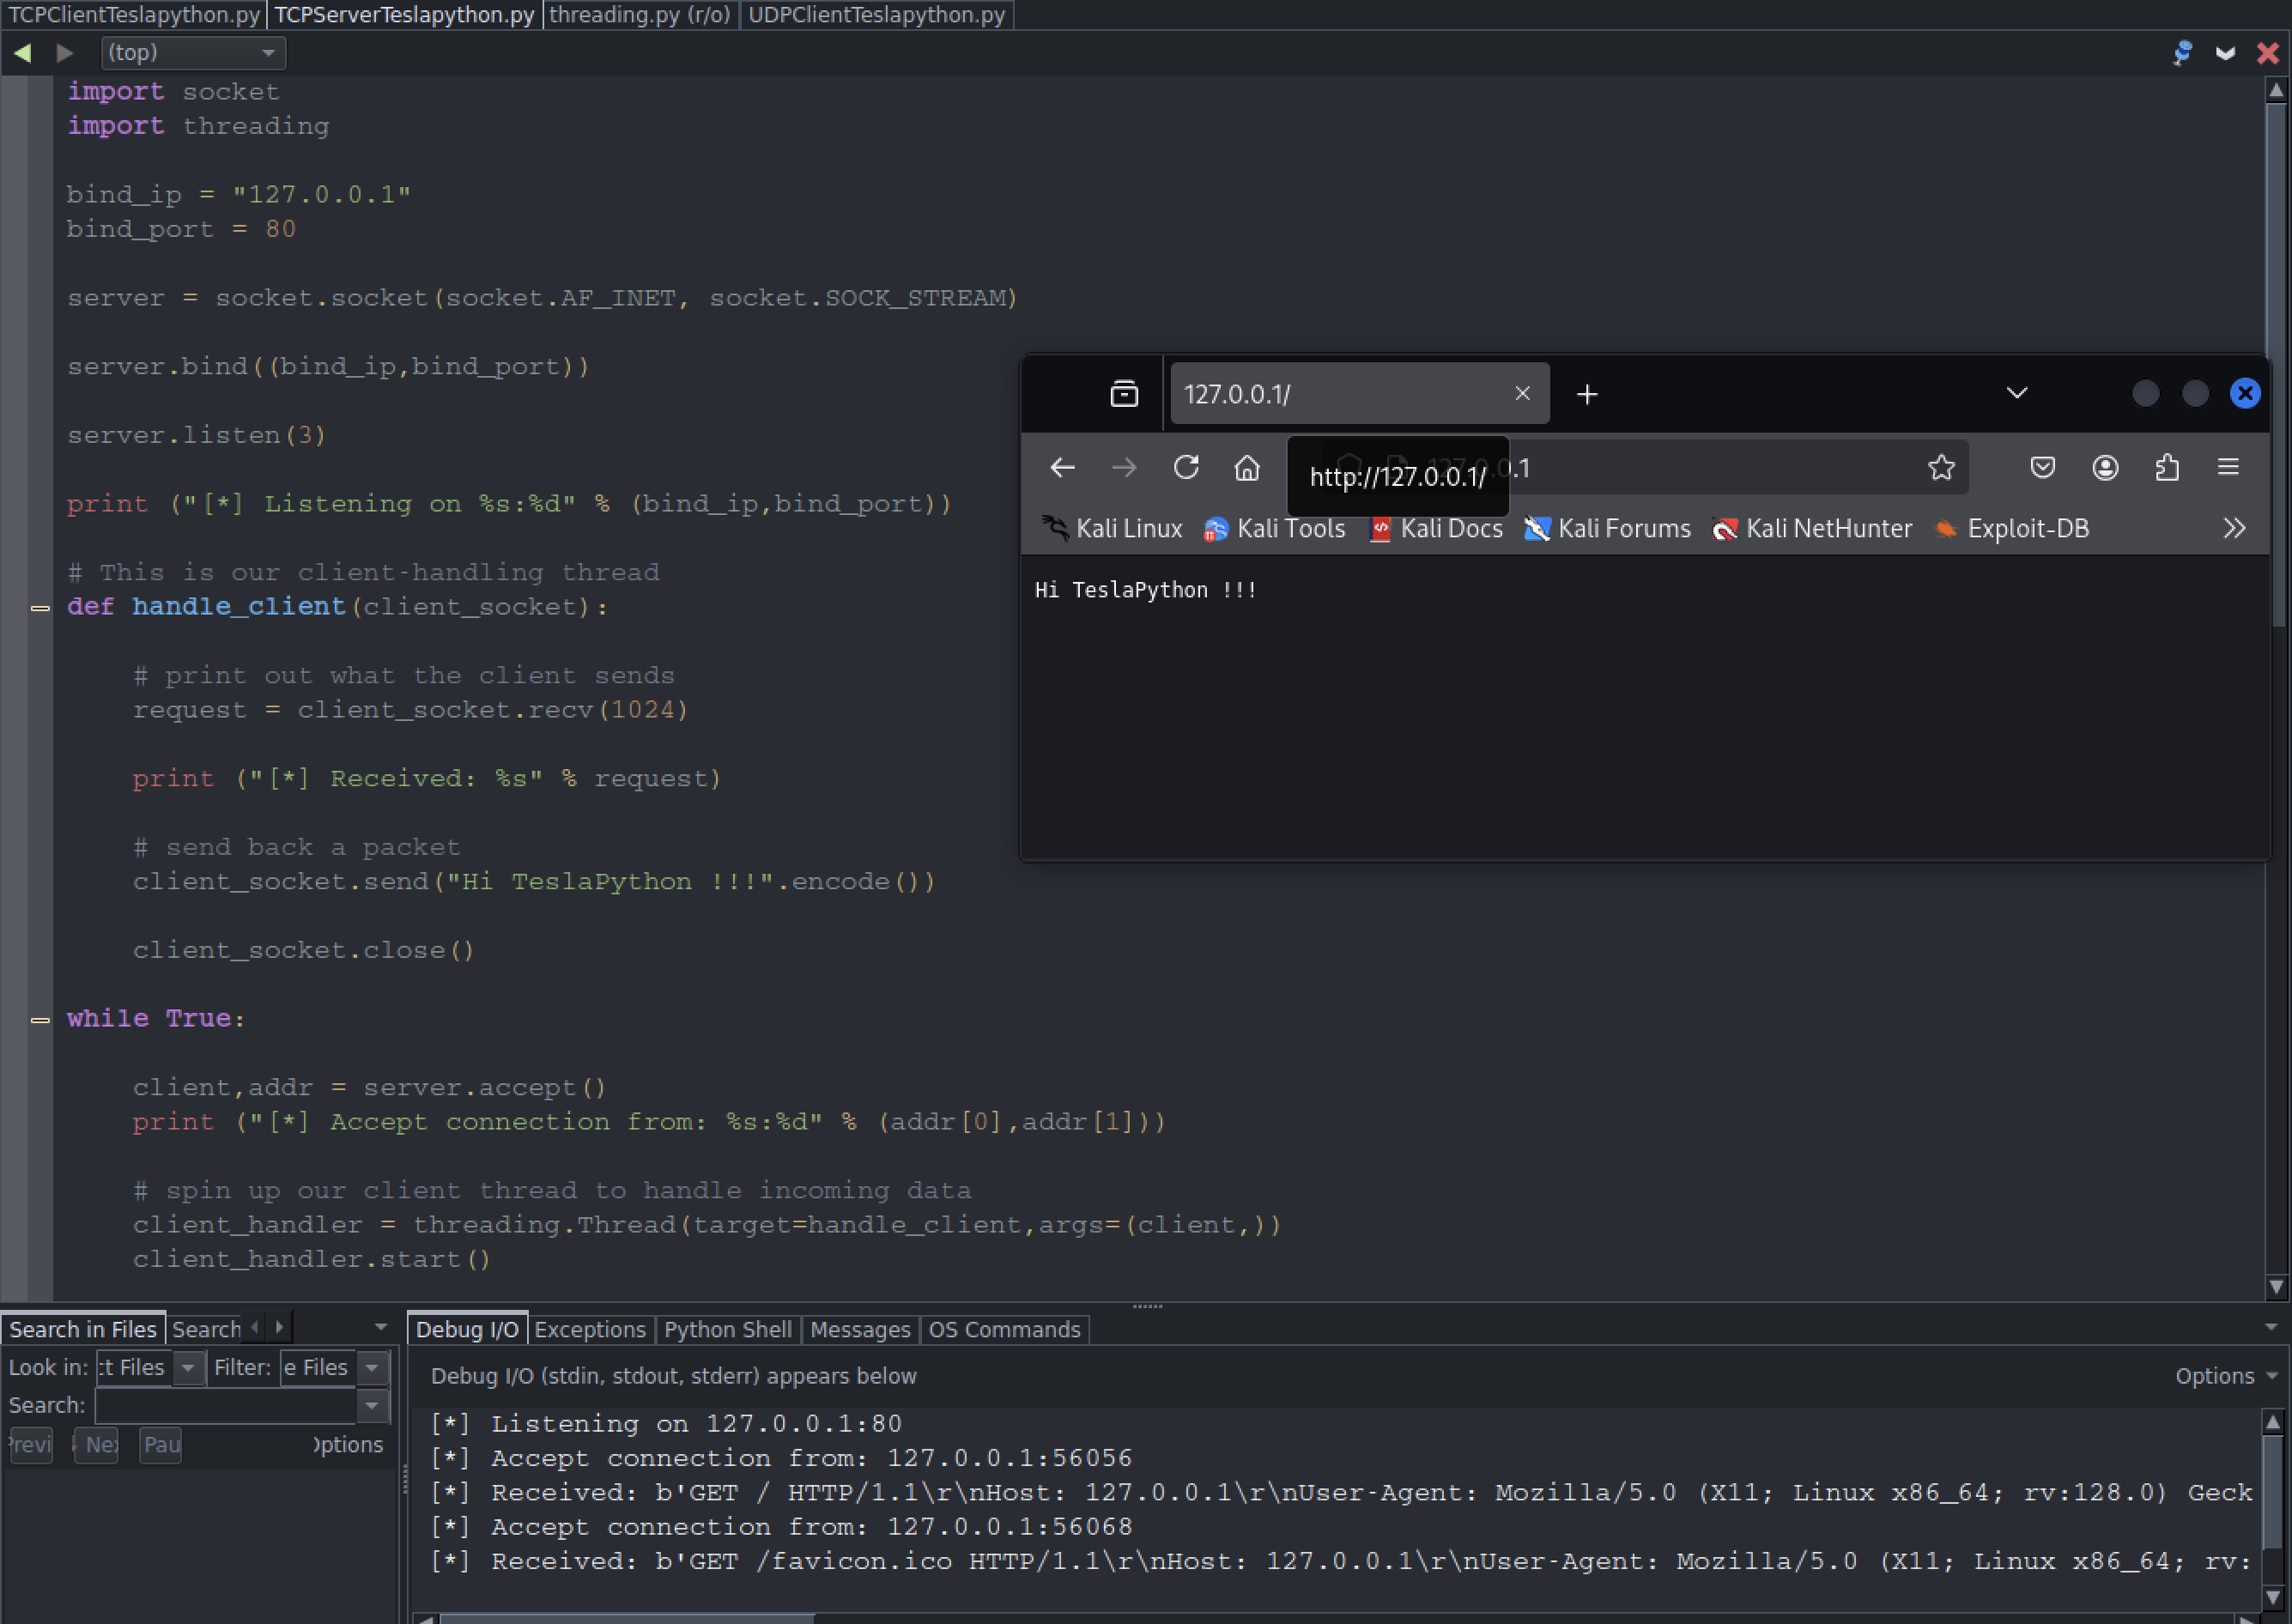
TCP Server
You might want to use your own TCP server when writing command shells or crafting a proxy. Crank out the code below and launch it, then open 127.0.0.1:80, after that it will create a file name threading.py automatically.
Netcat
Netcat is the utility knife of networking. It can be used for both attacking and securiy. In the case of attacking, it helps us to debug the network along it investigating it. It runs on all operating systems. On the other hand, I’ve run into servers that do have Python that names NetcatTeslapython.py
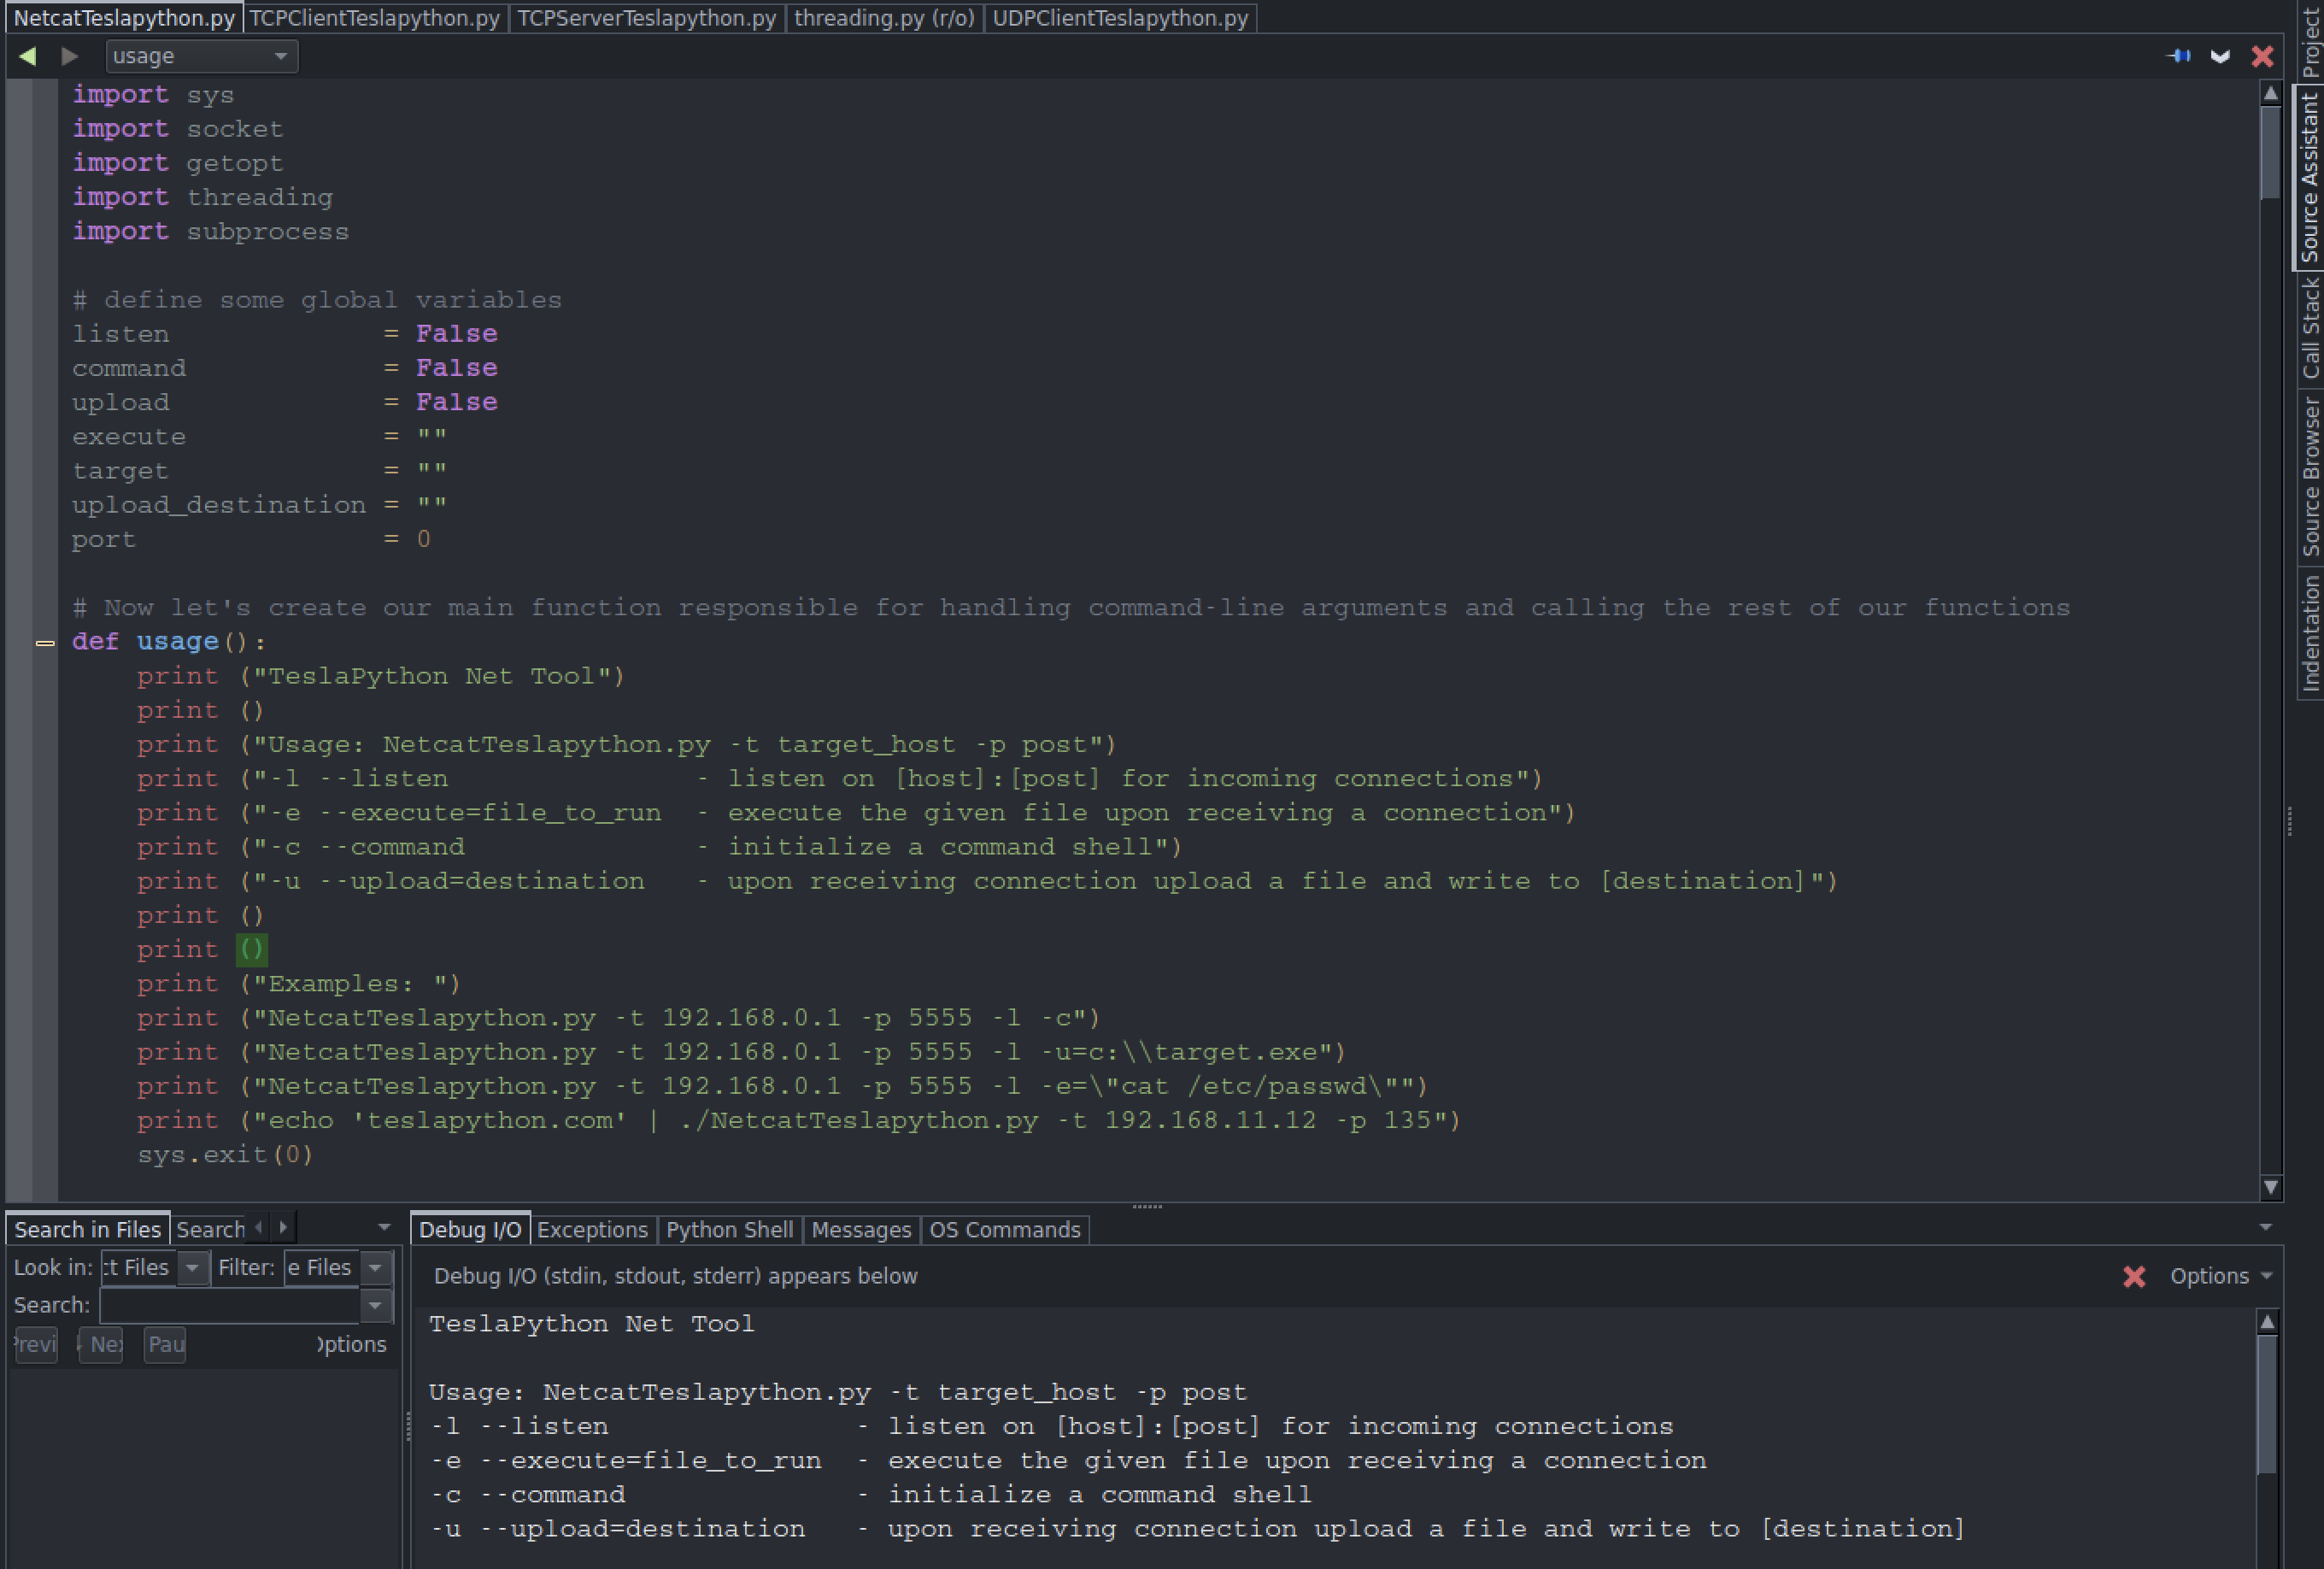
Open the Terminal in Kali Linux and run it
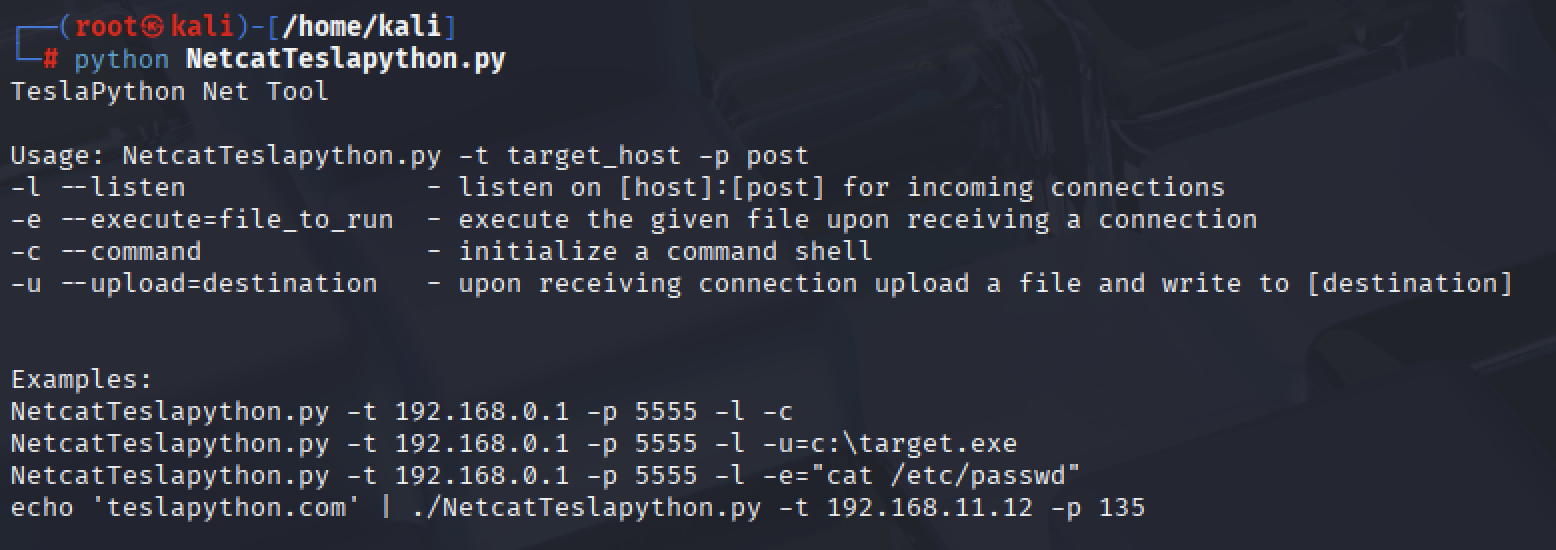
Run our script like so:
┌──(root㉿kali)-[/home/kali]
└─# python NetcatTeslapython.py -l -p 9999 -c

┌──(root㉿kali)-[/home/kali]
└─# python NetcatTeslapython.py -l localhost -p 9999

┌──(root㉿kali)-[/home/kali]
└─# echo -ne "GET / HTTP/1.1\r\nHost: teslapython.netlify.app\r\n\r\n" | python NetcatTeslapython.py -t teslapython.netlify.app -p 80
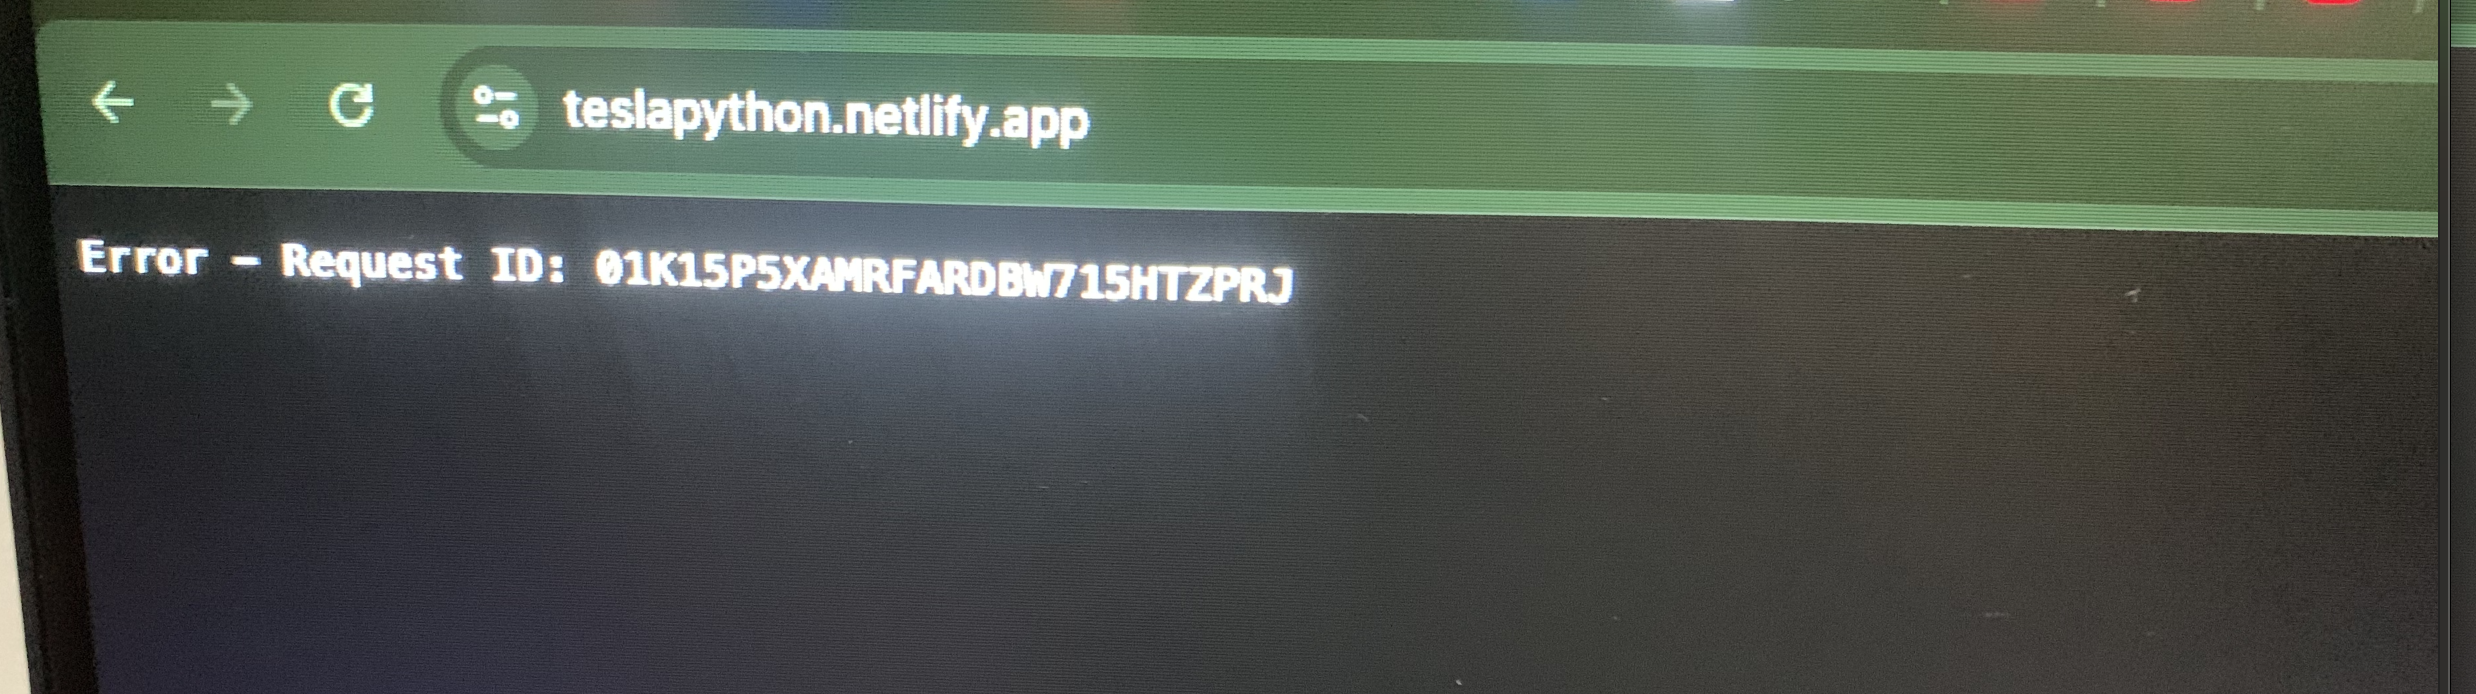
Open the webiste teslapython.netlify.app (this is used to testing, owned by TeslaPython Software Foundation)
nmap(Network Mapper)
nmap is a open source utility for network exploration and security auditing
Scan a range:
|---(kali@kali)-[~]
|--$ sudo su
[sudo] password for kali: kali
|---(root@kali)-[/home/kali]
|--# nmap 192.168.100.1-255
Starting Nmap 7.94SVN ( https://nmap.org ) at 2025-05-09 22:09 EDT
Nmap scan report for AP-AX3000CV2-F9B9.lan (192.168.100.1)
Host is up (0.028s latency).
Not shown: 996 closed tcp ports (reset)
PORT     STATE SERVICE
53/tcp   open  domain
80/tcp   open  http
443/tcp  open  https
5000/tcp open  upnp

Nmap scan report for 192.168.100.2
Host is up (0.32s latency).
All 1000 scanned ports on 192.168.100.2 are in ignored states.
Not shown: 1000 filtered tcp ports (no-response)

Nmap scan report for 192.168.100.3
Host is up (0.31s latency).
All 1000 scanned ports on 192.168.100.3 are in ignored states.
Not shown: 1000 filtered tcp ports (no-response)
Scan a domain:
|---(root@kali)-[/home/kali]
|--# nmap teslapython.com
Starting Nmap 7.94SVN ( https://nmap.org ) at 2025-05-09 22:52 EDT
Nmap scan report for teslapython.com (216.24.57.1)
Host is up (0.023s latency).
Not shown: 996 filtered tcp ports (no-response)
PORT     STATE SERVICE
80/tcp   open  http
443/tcp  open  https
8080/tcp open  http-proxy
8443/tcp open  https-alt

Nmap done: 1 IP address (1 host up) scanned in 18.35 seconds
No scan. List targets only:
┌──(kali㉿kali)-[~]
└─$ nmap 192.168.1.1-3 -sL
Starting Nmap 7.94SVN ( https://nmap.org ) at 2025-05-11 18:01 EDT
Nmap scan report for 192.168.1.1
Nmap scan report for 192.168.1.2
Nmap scan report for 192.168.1.3
Nmap done: 3 IP addresses (0 hosts up) scanned in 13.01 seconds
Disable post scanning:
┌──(kali㉿kali)-[~]
└─$ nmap 192.168.1.1 -sn
tarting Nmap 7.94SVN ( https://nmap.org ) at 2025-05-11 18:10 EDT
Note: Host seems down. If it is really up, but blocking our ping probes, try -Pn
Nmap done: 1 IP address (0 hosts up) scanned in 3.07 seconds

┌──(kali㉿kali)-[~]
└─$ ping 192.168.1.1
PING 192.168.1.1 (192.168.1.1) 56(84) bytes of data.
From 172.16.208.129 icmp_seq=1 Destination Host Unreachable
From 172.16.208.129 icmp_seq=2 Destination Host Unreachable
From 172.16.208.129 icmp_seq=3 Destination Host Unreachable
From 172.16.208.129 icmp_seq=4 Destination Host Unreachable
From 172.16.208.129 icmp_seq=5 Destination Host Unreachable
sublist3r
sublist3r tool to perform domain harvesting, search for subdomains of teslapython.com using the Bing search engine (-e bing) with 3 threads(-t 3)
┌──(root㉿kali)-[~]
└─# apt install sublist3r

              ____        _     _ _     _   _____
             / ___| _   _| |__ | (_)___| |_|___ / _ __
             \___ \| | | | '_ \| | / __| __| |_ \| '__|
              ___) | |_| | |_) | | \__ \ |_ ___) | |
             |____/ \__,_|_.__/|_|_|___/\__|____/|_|

             # Coded By Ahmed Aboul-Ela - @aboul3la

┌──(root㉿kali)-[~]
└─# sublist3r -d teslapython.com -t 3 -e bing
[-] Enumerating subdomains now for teslapython.com
[-] Searching now in Bing..
[-] Total Unique Subdomains Found: 3
www.teslapython.com
docs.teslapython.com
forum-teslapython.onrender.com
lm-sensors
lm-sensors identifying overheating issues which can cause unexpexted errors and crashes and allows you monitor hardware health by reading data from various sensors.
┌──(kali㉿kali)-[~]
└─$ sudo apt install lm-sensors
   [sudo] password for kali:
   Upgrading:
   libsensors-config  libsensors5  lm-sensors

   Summary:
   Upgrading: 3, Installing: 0, Removing: 0, Not Upgrading: 1757
   Download size: 155 kB
   Space needed: 24.6 kB / 63.8 GB available

   Continue? [Y/n] y
   Get:1 http://kali.download/kali kali-rolling/main amd64 libsensors-config all 1:3.6.2-2 [16.2 kB]
   Get:2 http://kali.download/kali kali-rolling/main amd64 libsensors5 amd64 1:3.6.2-2 [37.5 kB]
   Get:3 http://kali.download/kali kali-rolling/main amd64 lm-sensors amd64 1:3.6.2-2 [101 kB]
   Fetched 155 kB in 1s (130 kB/s)
   (Reading database ... 400961 files and directories currently installed.)
   Preparing to unpack .../libsensors-config_1%3a3.6.2-2_all.deb ...
   Unpacking libsensors-config (1:3.6.2-2) over (1:3.6.0-10) ...
   Preparing to unpack .../libsensors5_1%3a3.6.2-2_amd64.deb ...
   Unpacking libsensors5:amd64 (1:3.6.2-2) over (1:3.6.0-10+b1) ...
   Preparing to unpack .../lm-sensors_1%3a3.6.2-2_amd64.deb ...
   Unpacking lm-sensors (1:3.6.2-2) over (1:3.6.0-10+b1) ...
   Setting up libsensors-config (1:3.6.2-2) ...
   Installing new version of config file /etc/sensors3.conf ...
   Setting up libsensors5:amd64 (1:3.6.2-2) ...
   Setting up lm-sensors (1:3.6.2-2) ...
   Processing triggers for libc-bin (2.40-3) ...
   Processing triggers for man-db (2.13.0-1) ...
   Processing triggers for kali-menu (2024.4.0) ...
Detect the available sensors on your system:
┌──(kali㉿kali)-[~]
└─$ sudo sensors-detect
   [sudo] password for kali:
   # sensors-detect version 3.6.2
   # System: VMware, Inc. VMware Virtual Platform [None]
   # Board: Intel Corporation 440BX Desktop Reference Platform
   # Kernel: 6.11.2-amd64 x86_64
   # Processor: Intel(R) Core(TM) i9-9880H CPU @ 2.30GHz (6/158/13)

   This program will help you determine which kernel modules you need
   to load to use lm_sensors most effectively. It is generally safe
   and recommended to accept the default answers to all questions,
   unless you know what you're doing.

   Some south bridges, CPUs or memory controllers contain embedded sensors.
   Do you want to scan for them? This is totally safe. (YES/no): y
   Module cpuid loaded successfully.
   Silicon Integrated Systems SIS5595...                       No
   VIA VT82C686 Integrated Sensors...                          No
   VIA VT8231 Integrated Sensors...                            No
   AMD K8 thermal sensors...                                   No
   AMD Family 10h thermal sensors...                           No
   AMD Family 11h thermal sensors...                           No
   AMD Family 12h and 14h thermal sensors...                   No
   AMD Family 15h thermal sensors...                           No
   AMD Family 16h thermal sensors...                           No
   AMD Family 17h thermal sensors...                           No
   AMD Family 15h power sensors...                             No
   AMD Family 16h power sensors...                             No
   Hygon Family 18h thermal sensors...                         No
   AMD Family 19h thermal sensors...                           No
   Intel digital thermal sensor...                             No
   Intel AMB FB-DIMM thermal sensor...                         No
   Intel 5500/5520/X58 thermal sensor...                       No
   VIA C7 thermal sensor...                                    No
   VIA Nano thermal sensor...                                  No
Once the available sensors are detected, you can view the temperature of your system using the sensors command:
┌──(kali㉿kali)-[~]
└─$ sensors
   BAT1-acpi-0
   Adapter: ACPI interface
   in0:          10.00 V
   power1:           N/A
stress-ng
stress-ng utility to test your CPUs
┌──(kali㉿kali)-[/home/kali]
└─PS> sudo apt install stress-ng
[sudo] password for kali:
Installing:
stress-ng

┌──(kali㉿kali)-[/home/kali]
└─PS> stress-ng --cpu 8 --timeout 60
stress-ng: info:  [5882] setting to a 1 min run per stressor
stress-ng: info:  [5882] dispatching hogs: 8 cpu
stress-ng: info:  [5882] skipped: 0
stress-ng: info:  [5882] passed: 8: cpu (8)
stress-ng: info:  [5882] failed: 0
stress-ng: info:  [5882] metrics untrustworthy: 0
stress-ng: info:  [5882] successful run completed in 1 min
In the above command, 8 is the number of CPU cores you’d like to test and 60 is the duration in seconds. The command will stress all 8 CPU cores for 60 seconds. Notice the CPU is at 100% load during the test.
smartmontools
smartmontools to identify disk issues and evaluate hard drive health
┌──(kali㉿kali)-[/home/kali]
└─PS> sudo apt install smartmontools
[sudo] password for kali:
Upgrading:
smartmontools

┌──(kali㉿kali)-[/home/kali]
└─PS> lsblk
NAME   MAJ:MIN RM  SIZE RO TYPE MOUNTPOINTS
sda      8:0    0 80.1G  0 disk
└─sda1   8:1    0 80.1G  0 part /

┌──(kali㉿kali)-[/home/kali]
└─PS> sudo smartctl -H /dev/sda
smartctl 7.4 2023-08-01 r5530 [x86_64-linux-6.11.2-amd64] (local build)
Copyright (C) 2002-23, Bruce Allen, Christian Franke, www.smartmontools.org

=== START OF READ SMART DATA SECTION ===
SMART Health Status: OK
journalctl
journalctl is a command to query the “systemd” journal logs. “systemd” is a Linux system manager responsible for booting the system, managing system processes, and handling system services.
You can check system logs for hardware-related errors using the command:
┌──(kali㉿kali)-[/home/kali]
└─PS> journalctl -k | grep -iE "error|fault|panic"
May 16 22:18:29 kali kernel: pid_max: default: 32768 minimum: 301
May 16 22:18:29 kali kernel: Yama: disabled by default; enable with sysctl kernel.yama.*
May 16 22:18:29 kali kernel: iommu: Default domain type: Translated
May 16 22:18:29 kali kernel: NetLabel:  unlabeled traffic allowed by default
May 16 22:18:29 kali kernel: RAS: Correctable Errors collector initialized.
May 16 22:18:29 kali systemd[1]: Queued start job for default target graphical.
free
free - analyzing memory performance RAM
┌──(kali㉿kali)-[/home/kali]
└─PS> free -mh
               total        used        free      shared  buff/cache   available
Mem:           1.9Gi       943Mi       267Mi       9.7Mi       946Mi       1.0Gi
Swap:          1.0Gi          0B       1.0Gi
If you feel your system is getting slow and taking longer to finigh tasks, check your system’s available memory. Where -h is for human-readable output and -m is for displaying memmory MB. Look at the “available”, this shows how much RAM is free for use. This will ensure there is enough available memory including the swap memory.
top
top - another way to check the memory RAM in real timeout
┌──(kali㉿kali)-[/home/kali]
└─PS> top
top - 07:43:27 up  9:25,  2 users,  load average: 0.00, 0.00, 0.00
Tasks: 211 total,   1 running, 210 sleeping,   0 stopped,   0 zombie
%Cpu(s):  0.5 us,  0.2 sy,  0.0 ni, 99.2 id,  0.0 wa,  0.0 hi,  0.0 si,  0.0 st
MiB Mem :   1964.9 total,    230.1 free,    977.8 used,    950.4 buff/cache
MiB Swap:   1024.0 total,   1024.0 free,      0.0 used.    987.1 avail Mem

   PID USER      PR  NI    VIRT    RES    SHR S  %CPU  %MEM     TIME+ COMMAND
  1001 root      20   0  527752 234468  62252 S   1.0  11.7   2:23.09 Xorg
   595 root      20   0  317736   9532   7996 S   0.3   0.5   0:56.56 vmtoolsd
  1291 kali      20   0 1278168 125596  83456 S   0.3   6.2   1:38.56 xfwm4
  2227 kali      20   0  466984 107864  92520 S   0.3   5.4   0:05.61 qterminal
181628 root      20   0       0      0      0 I   0.3   0.0   0:02.21 kworker/0:1-events
     1 root      20   0   23008  13772  10000 S   0.0   0.7   0:02.44 systemd
     2 root      20   0       0      0      0 S   0.0   0.0   0:00.01 kthreadd
Press Shift + m to sort the processes by memory usage. Alternately, press m to see the memory usage in a progress bar like format.
top - 22:05:21 up 21:36,  2 users,  load average: 0.00, 0.00, 0.00
Tasks: 204 total,   1 running, 203 sleeping,   0 stopped,   0 zombie
%Cpu(s):  1.1 us,  0.6 sy,  0.0 ni, 98.3 id,  0.0 wa,  0.0 hi,  0.0 si,  0.0 st
MiB Mem : 53.3/1964.9   [||||||||||||||||||||||||||||||||||||||||||||||||||||||  ]
MiB Swap:  0.0/1024.0   [                                                        ]
ps
ps - command shows a snapshot of the current running processes and their PIDs.
Here’s an example: This command will display all the Python processes running on the system, along with their PIDs.
┌──(kali㉿kali)-[~]
└─$ ps aux | grep python
kali        1434  0.0  2.8 526852 58192 ?        Sl   00:29   0:00 /usr/bin/python3 /usr/bin/blueman-applet
kali        1522  0.0  1.9  64044 39232 ?        S    00:29   0:00 /usr/bin/python3 /usr/share/system-config-printer/applet.py
kali      633248  0.0  0.1   6452  2284 pts/0    S+   22:18   0:00 grep --color=auto python
How to Kill a process using its PID:
┌──(kali㉿kali)-[~]
└─$ kill -9 <PID>
Information gathering - dns analysis
We could also use the website teslapython.netlify.app to testing.
dnsenum is to gather as much infomation as possible about a domain.

dnsmap is a tool that enables to discover all subdomains associated to a given domain.
┌──(kali㉿kali)-[~]
└─$ dnsmap teslapython.com
dnsmap 0.36 - DNS Network Mapper

[+] searching (sub)domains for teslapython.com using built-in wordlist
[+] using maximum random delay of 10 millisecond(s) between requests
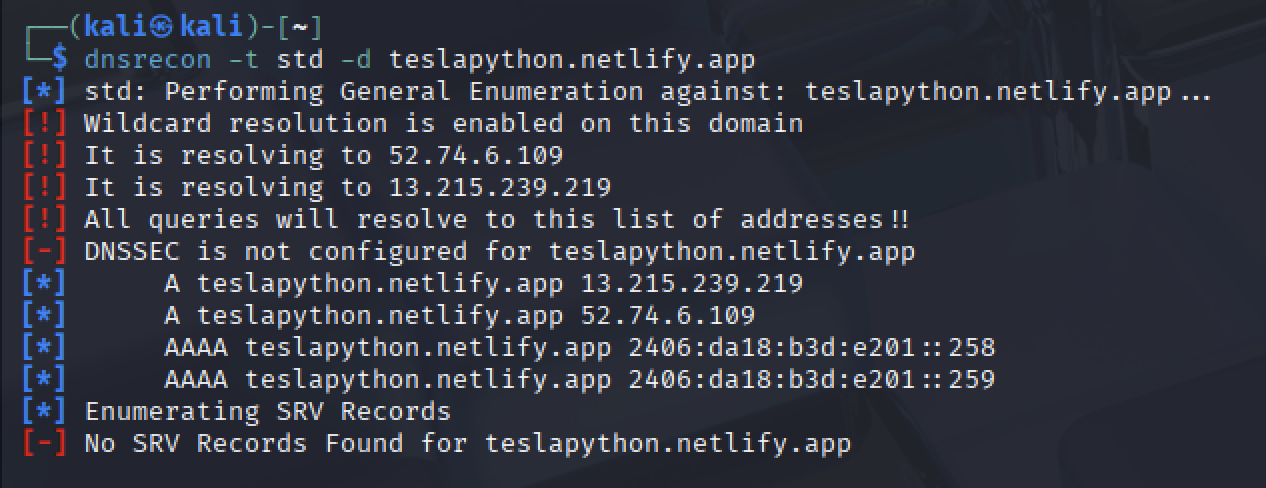
dnsrecon enables to gather DNS-oriented information on a given target.
Information gathering - IDS/IPS identification
Python programming for
WireShark
You can use Wireshark in scenarios like troubleshooting network performance issues such as slow connections or dropped packets, investigating suspious activity (like detecting malware or unauthorized access).
Installing Wireshark on Ubuntu
teslapython@teslapython:~$ sudo su
[sudo] password for teslapython:
root@teslapython:/home/teslapython# sudo apt update
root@teslapython:/home/teslapython# sudo apt install wireshark -y
Launching Wireshark
teslapython@teslapython:~$ wireshark

Capture your own traffic
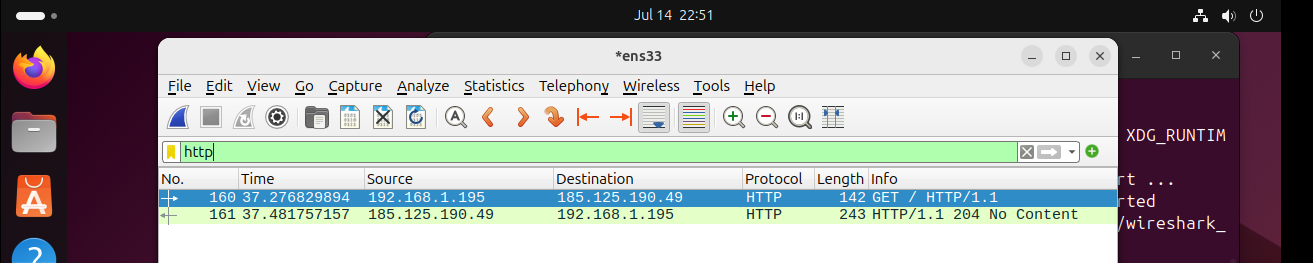
It is up to your own traffic, in here, find the ens33 interface, double-click on ens33, and then click the red square “Stop” button in the Wireshark toolbar (aim for at least 20-30 packets).
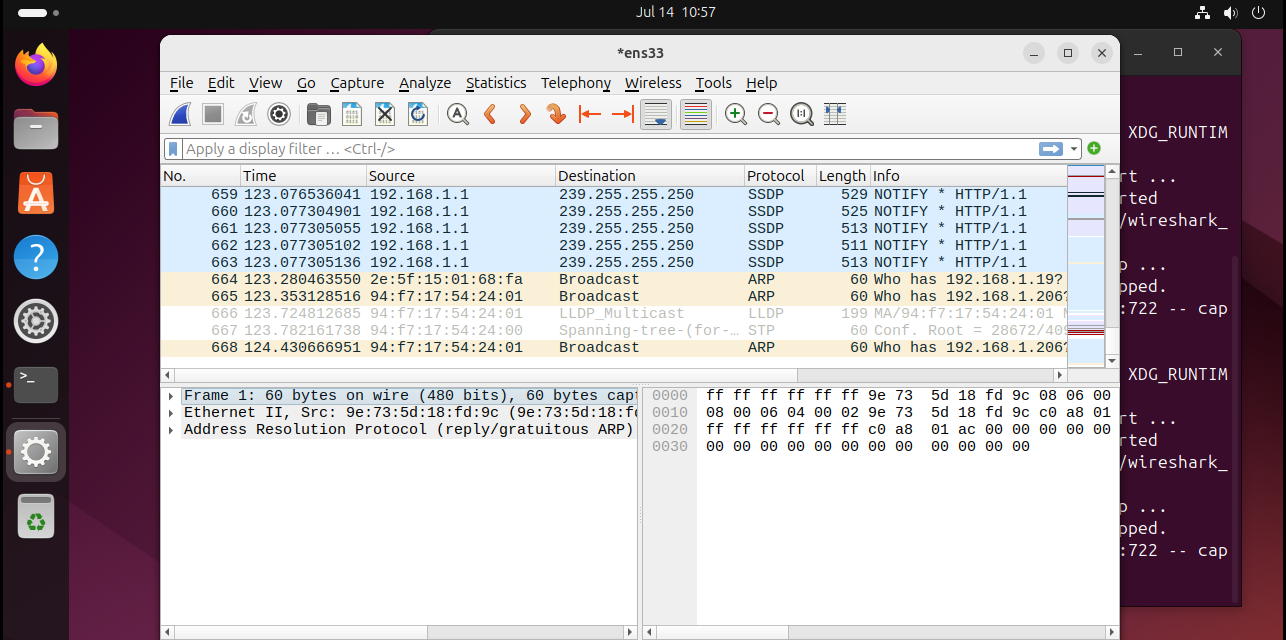
Filter toolbar
Take a look at the top of the Wireshark window. It might be labeled “Apply a display filter…”. This is the place where you’ll enter your display filters.
Basic protocol filters
http
After you apply this filter, Wireshark will only display HTTP packets. This typically includes web requests (when you ask a website for infomation) and responses (when the website sends you the information)
You can try different protocols that might be present, such as TCP, UDP, or DNS.
Fitering based on packet size
Network attacks often involve packets with unusual sizes. Attackers might use large or small packets to hide malicious data or to disrupt the normal functioning of the network. To filter based on packet size, we use a specific syntax:
tcp.len >= 90 and tcp.len <= 399

Using the “contains” operator for text Searching
frame contains "admin"
frame contains "password"
This filters shows packets containing the word “password” or “admin” anywhere in the packet data. This can be helpful for detecting security issues. For instance, if the passwords are being sent in clear text which is a huge security risk.
Cain & Abel ( owned by Massimiliano Montoro)
Last update:
Jul 28, 2025